LDAP Integration in ServiceNow
LDAP termed as Lightweight directory access protocol. LDAP integration in ServiceNow allows you to query information from an LDAP server and update your ServiceNow database.
LDAP uses a client/server setup where an LDAP application asks an LDAP server for information. After logging in, the server gets the data from the database and sends it back to the application.
A group is a collection of users with a shared purpose. Group members handle tasks like approving changes, resolving incidents, receiving email notifications, or performing change request tasks. It’s important to assign every user to at least one group.
In ServiceNow, LDAP integration allows the platform to connect with an LDAP server for user login and data updates. The LDAP application acts as the client, sending a username and password to the server for verification. If the credentials are correct, the server sends the requested data. Importantly, the password is only used within the secure HTTPS session and is never stored.

There are two main parts to LDAP integration are Data Population and Authentication
LDAP integration helps you quickly fill ServiceNow with user records from your existing LDAP database. You can use configuration flags to create, ignore, or skip incoming LDAP records to avoid data inconsistencies. By specifying LDAP attributes, you can limit the data imported to only what you need. If no attributes are specified, all available object attributes from the LDAP server are imported.
In an LDAP-integrated ServiceNow setup, user login credentials are sent to all defined LDAP servers. This allows users to log in to ServiceNow using the same credentials they use for other internal resources on your network.
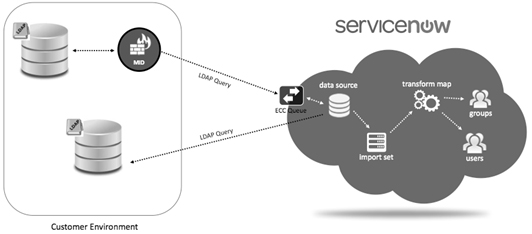
Integrating LDAP with a Mid Server
Using an LDAP server with a Mid Server is the most common method because it’s easy to set up and doesn’t require much effort from the company’s AD admin. You’ll need to set up a Mid Server for this method. However, note that you can’t use this method for authentication (login) and it doesn’t support SSL connections. For authentication, an SSO connection is typically configured. This way, you use LDAP integration to import users and groups, while SSO handles the authentication process.
Setting up the LDAP Integration
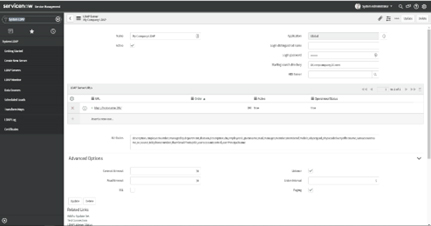
Create a New LDAP Server
When importing data from LDAP, it’s important to specify which attributes you want to include. If you don’t, the import set might create too many fields, potentially exceeding the row size limit.
- Search for LDAP in the Application Navigator and create a new server.
- Type of LDAP Server: Choose Active Directory or another type if needed.
- Server Name: Enter a name like “TestLDAPIntegration.”
- Server URL: Use a free LDAP test server URL (e.g., forumsys.com) and paste it into ServiceNow.

To begin searching for users and groups in an LDAP integration, you need to specify the starting search directory. This setting determines the location from which the search will commence. By defining this directory, you ensure that the search process is efficient and targets the correct organizational units.
Submitting the Form: A Step-by-Step
To integrate with an LDAP server, you need to follow a few straightforward steps.
- First, submit the form, and you will see a new record with your details.
- Next, enter the Login Distinguished Name and Password to allow access to the server. These details can typically be found on the test server website.
- Finally, save and submit the form to complete the process. This ensures that the LDAP server is correctly configured and accessible, facilitating seamless integration and efficient data management.
Ensuring the Connection is Active
Once you’ve decided on the data to import, update the LDAP OU Definitions found at the bottom of the LDAP Server record form. After setting it up, click the Browse button on the LDAP OU Definition to ensure it’s pointing to the correct location as Below Steps:

- A success message should appear if the connection works.
- Under LDAP OU Definitions, click “Users.”
- Replace the default filter with the specific data you need (e.g., users with names starting with “e”).
- Use the ‘Test connection’ link to secure the connection and the ‘Browse’ link to check if it worked.
Importing and Mapping Data Efficiently
Import sets in ServiceNow act as temporary staging tables where data is held before being transformed into actual ServiceNow records. The LDAP User Import transform map is the one you usually adjust. Here are some common configurations for the user transform map.
- Fetch the user data and populate it into your ServiceNow database (sys_user table).
- Under LDAP OU Definition > Users, click on the data source to access the import set.
- Click “Load All Records.”
- Create a transform map, name it, set the target table to sys_user, and automap fields.
- Then, use the mapping assist tool to match fields, such as mapping UID to UserID.
Once the mapping is done, save and transform the data. After the transformation, check to ensure that the users have been successfully added to the user table. This process helps ensure that all user data is correctly imported and mapped.
Summary:
ServiceNow assists with various aspects of the integration process by creating necessary components like data sources, OU definitions, transform maps, and import set tables. However, setting up queries and filters can sometimes be challenging.
I recommend starting by building a filter using PowerShell or in AD Users & Computers. You can also ask your AD admin for help. Understanding organizational units is crucial for LDAP integration.
By: Naveen Gupi
